There are two major client side library’s which we can use with react for GraphQL a) Apollo b) Relay
In the post we will look at Apollo and how to use it. If we compare Apollo with Relay
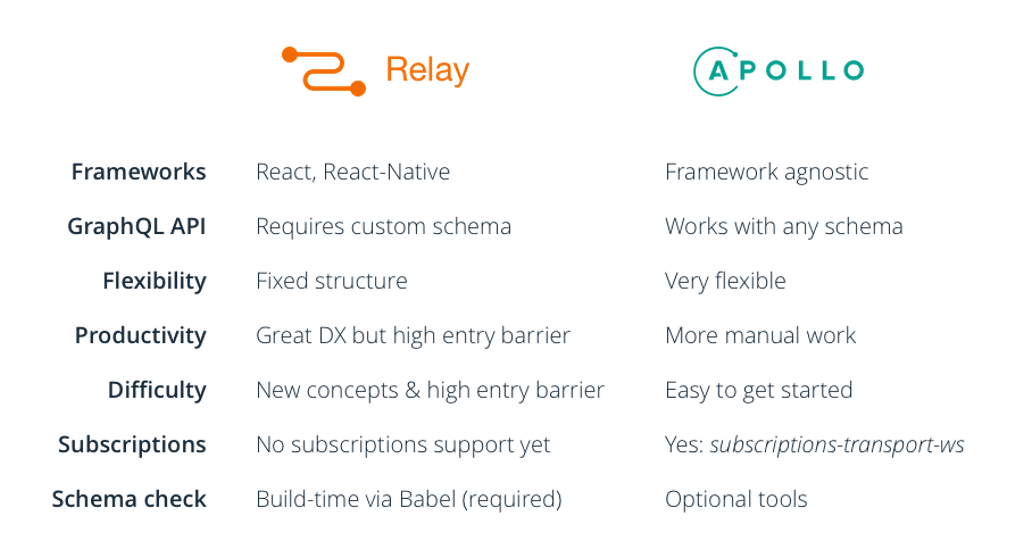
Apollo
- Very simple to learn and fast to implement
- Work’s cross platform, we can use this on React/Angular/Vue etc
This is the major reasons for using apollo client, here is a very short comparison for the same.
Also this is the official guide https://www.apollographql.com/docs/react/ on getting starting which you should also refer.
Let’s start by first creating a new react app using “create-react-app”
npx create-react-app gql-test
# once project is installed
cd gql-test/
yarn add apollo-boost react-apollo graphql --save
Now our project is ready
Step2
For the GraphQL backend, we will use the code which we did on earlier blogs. Here is the git link for the same, you can clone and install it if required.
Make sure the GraphQL server is running, in my case its running on localhost:4000
Step3
First, let’s check if we are able to establish connection to our graphql backend

So our query works, lets do the same in our React App
Add this code to your App.js
import ApolloClient from "apollo-boost";
import gql from "graphql-tag";


const client = new ApolloClient({
  uri: "http://localhost:4000"
});

client
  .query({
    query: gql`
      {
        todos {
          id
        }
      }
    `
  })
  .then(result => console.log(result));
Now you see the response in your console

P.S Similar to query() we have mutate() function as well https://www.apollographql.com/docs/react/api/apollo-client.html#ApolloClient.mutate and we can use these directly in our app similar to ajax request. This part of base apollo-client which is cross platform, but since we are looking at react specific integrations we need to use something different. But these can be used to debug queries if required
https://github.com/reactexcel/graphql-todo/commit/2d66085f3ea1525f600f90fe168d7e3aedd0ad14
Step4
Let’s take this a step further and <Query> component and <ApolloProvider>
So now the code looks like this
const client = new ApolloClient({
  uri: "http://localhost:4000"
});
class App extends Component {
  render() {
    return (
      <ApolloProvider client={client}>

        <Query query={gql`
        {
          todos {
            id
          }
        }
        `}>
          {({ loading, error, data }) => {
            console.log(data, "data")
            console.log(loading, "loading")
            console.log(error, "error")
            return (<div className="App">
              <header className="App-header">
                <img src={logo} className="App-logo" alt="logo" />
                <p>
                  Edit <code>src/App.js</code> and save to reload.
                </p>
                <a
                  className="App-link"
                  href="https://reactjs.org"
                  target="_blank"
                  rel="noopener noreferrer"
                >
                  Learn React
                </a>
              </header>
            </div>
            )
          }}
        </Query>

      </ApolloProvider>
    );
  }
}

This <Query> fires api automatically on component load and returns the data. It also does a lot of things like autoRefresh, caching and many more things read in detail here https://www.apollographql.com/docs/react/essentials/queries.html
Current code status
https://github.com/reactexcel/graphql-todo/commit/7e4c31d875e875a9a3490afd5906a102cc1cbe47
Step5
Let’s make a smaller change to how we define our query for better code readability
const GET_TODO = gql`
{
  todos {
    id
  }
}
`;

<Query query={GET_TODO}>
https://github.com/reactexcel/graphql-todo/commit/dae15945d21eef098d88a2583630d6e66e12c256
This just makes the code more readable and our queries are reusable
Step6
Let’s display the todo’s
First let’s create Todo components
import React from 'react';


const Todo = ({ task, isComplete }) => (
    <div>
        {task} - {isComplete}
    </div>
);

export default Todo

// add this to the Query

             <Query query={GET_TODO}>
              {({ loading, error, data: { todos } }) => {

                if (error) return <div>{error}</div>
                if (loading) return <div>loading</div>

                return todos.map((todo) => {
                  return <Todo key={todo.id} {...todo} />
                })

              }}
            </Query>
Quite simple!
If you run the app, you won’t see any Todo’s as there are no todo’s added in our database. So go the GQL playground and add todo’s from there using mutation.
Step7
Now, lets see how we can addTodo via do mutations
const ADD_TODO = gql`
  mutation addTodo($task: String){
  addTodo(input: {
    task : $task,
    isComplete: false
  }) {
    id,
    task
  }
}
`;
P.S since we are using variable’s in this mutation we need to first define it as “mutation addTodo($task: String)”
<Mutation mutation={ADD_TODO}>
              {(addTodo) => {

                return (
                  <form onSubmit={(e) => {
                    e.preventDefault()
                    addTodo({
                      variables: {
                        task: this.state.task
                      }
                    })
                    this.setState({
                      task: ""
                    })
                  }}>
                    <input onChange={(e) => { this.setState({ "task": e.target.value }) }} type="text" value={this.state.task} />
                    <button type="submit">Add Todo</button>
                  </form>
                )

              }}
            </Mutation>
Read in detail about mutation here https://www.apollographql.com/docs/react/essentials/mutations.html
You will also notice that, even if after the mutation is successful it doesn’t show the new todo. Only when you refresh the browser do you see the new todo. The reason for this apollo has “caching” internally.
This is are many things happening inside mutations, its important to read about this in detail.
Step 8 – Caching
Internally apollo using cache to for all “queries”
So any query that we have, apollo creates an internal normalized cache for it. normalized means, it will not be a tree structure it will be a id based key, value pair structure.
Due to this reason, when we update the TODO, apollo doesn’t update the Query, due to cache.
So we need to update the internal cache and add todo to it, that way our UI will also get updated. Update the code like this
<Mutation
              mutation={ADD_TODO}
              update={(cache, { data: { addTodo } }) => {
                const { todos } = cache.readQuery({ query: GET_TODO });
                cache.writeQuery({
                  query: GET_TODO,
                  data: { todos: todos.concat([addTodo]) },
                });
              }}
            >
https://github.com/reactexcel/graphql-todo/commit/5e1a3d0c88c8200d112b9d459063ced671a66bea
See latest code here, and now it will update the UI instantly.
Caching is a very important part of apollo, read about it here in detail. Its important to understand how it works in detail
https://www.apollographql.com/docs/react/essentials/mutations.html#update
https://www.apollographql.com/docs/react/advanced/caching.html
Redux
If you have been using rest api’s in the past, redux is something that we heavily use. But with graphQL, redux is not needed at all because all data we are fetching in the same json structure as what we require and data is stored in internal cache. So we can always call cache.readQuery() anywhere in our application to access the same data instead of having a separate state.
Apollo caching is playing the same role as redux, and it use GQL to query it!
Read this article for the same https://hackernoon.com/how-graphql-replaces-redux-3fff8289221d
We can still use redux with graphql, but i feel its redundant to use it. We can use component state to manage ui and apollo cache to manage the data
Step 8
Now, let’s see how we can do update our todo. Suppose we want to mark the todo as complete and also update the todo text lets see how we can do it.
First’s let see our mutation in the GQL playground

P.S. We can easily see the entire mutation structure from here

We can also add variables here in our playground

Now, we can copy this to our react code and setup mutation. At this let’s do some refactor as well. Here is the full source for the mutation
https://github.com/reactexcel/graphql-todo/commit/9c9ce8bee0aaadc770b65f96cb5277b06efa6558
Make sure to go through it properly as there many things done in it.
Also if you notice, we didn’t need to add any code related to “cache”. The main reason being apollo, manage cache automatically for updates only if we return the same ID. i.e after update the Todo returned has the same “id” as in our todo list so apollo cache is updated automatically
So this a full introduction on using apollo with react with a todo example